How to Read Blueprints for Takeoffs: 2026 Guide
Learn how to read blueprints for takeoffs effectively to minimize errors and maximize profits. Get accurate estimates now!

Reading blueprints for takeoffs is the process of interpreting construction drawings to quantify project materials accurately for estimates and bids. Every miscalculation traced back to a misread plan costs real money. Misreading prints can cause up to 30% rework, which means a single bad takeoff can erase your margin on an entire job. Tools like PlanSwift, STACK, and Won2build Takeoff have made the process faster, but the foundation is still your ability to interpret construction plans correctly before any software touches the numbers. This guide covers the documents, methods, and workflows that separate accurate estimates from expensive guesses.
How to read blueprints for takeoffs: start with the right documents
Before you measure a single line, you need to confirm you are working with the right set of drawings. Jumping straight into dimensions without reviewing the full document package is the fastest way to bid the wrong scope.
The cover sheet is your starting point. The cover sheet legend is essential for decoding symbols, hatch patterns, and drawing shorthand used throughout the entire set. Experienced contractors call the blueprint legend their best friend for quick, accurate decoding. Spend five minutes here and you will save hours of confusion later.

Check revision dates before anything else. Verifying the drawing revision date matches the spec book is a non-negotiable first step. Bidding from a superseded drawing set is one of the most common and costly mistakes in commercial estimating. Every sheet carries a title block with its revision number, date, and sheet purpose. Ignoring title blocks leads to errors and missed updates that can invalidate your entire takeoff.
Know your sheet classifications. Construction drawing sets are organized by discipline. “A” sheets are architectural, “S” sheets are structural, “M” sheets cover mechanical, “E” sheets cover electrical, and “P” sheets cover plumbing. Each trade’s takeoff pulls from a specific subset of these sheets, so knowing where to look saves time and prevents scope gaps.
Treat the specification book as a partner to the plans. Specification books define material quality while blueprints define location and quantity. Pricing materials from plans alone without referencing specs risks using the wrong grades or finishes. A blueprint might show a concrete wall, but the spec book tells you the compressive strength, mix design, and finish requirements that determine actual cost.
Pro Tip: Print or bookmark the sheet index on day one. Cross-reference it against the spec book’s table of contents to confirm every drawing referenced in the specs actually exists in your plan set.
How do you interpret scales, dimensions, and symbols accurately?
Scale misreading is the single most common source of measurement error in blueprint analysis for contractors. Understanding how scales work on construction drawings is not optional. It is the technical core of reading blueprints for estimates.
Multiple scales appear on a single sheet
Most construction sheets carry more than one scale. A floor plan might be drawn at 1/8" = 1’0", while a detail inset on the same sheet is drawn at 1/2" = 1’0". Blueprints use multiple scales per sheet, and you must verify the scale for each individual view before measuring. Never assume one scale applies to the entire sheet.
What “n.t.s.” means and why it matters
“N.T.S.” stands for “not to scale.” When a drawing is labeled N.T.S., it is a diagram only. Do not scale N.T.S. drawings manually. Use only the labeled dimensions on those views. Measuring an N.T.S. drawing with a ruler or digital trace tool will produce numbers that have no relationship to actual field conditions.
Reading dimension lines correctly
Dimension lines show the measured distance between two extension lines, with the value labeled above or below the line. Dimensions on U.S. construction drawings are written in feet and inches. A label reading 12’6" means twelve feet, six inches. Always read the labeled dimension first. Only use a scaled measurement when no labeled dimension exists.
The table below shows the most common scale types and their typical applications:
| Scale | Common Use | Notes |
|---|---|---|
| 1/8" = 1’0" | Floor plans, site plans | Most common for large areas |
| 1/4" = 1’0" | Enlarged floor plans, elevations | More detail than 1/8" |
| 1/2" = 1’0" | Wall sections, stair details | Used for complex assemblies |
| 1" = 1’0" | Door and window details | High-detail components |
| 3" = 1’0" | Connection details, hardware | Very fine construction details |
Calibrating scales in digital takeoff software
Digital tools like PlanSwift and Won2build Takeoff let you calibrate the drawing scale using a known dimension or a graphical scale bar. Here is the standard calibration process:
- Open the drawing sheet in your takeoff software.
- Locate the graphical scale bar or a labeled dimension you can verify.
- Use the software’s calibration tool to draw a line matching that known distance.
- Enter the real-world value. The software recalculates all measurements on that sheet.
- Confirm calibration by checking a second labeled dimension against your scaled measurement.
- Repeat this process for every sheet, since each sheet may carry a different scale.
Pro Tip: Always calibrate from a horizontal or vertical dimension, not a diagonal. Diagonal measurements introduce trigonometric error that compounds across large areas.
What is the step-by-step process for a trade-by-trade takeoff?
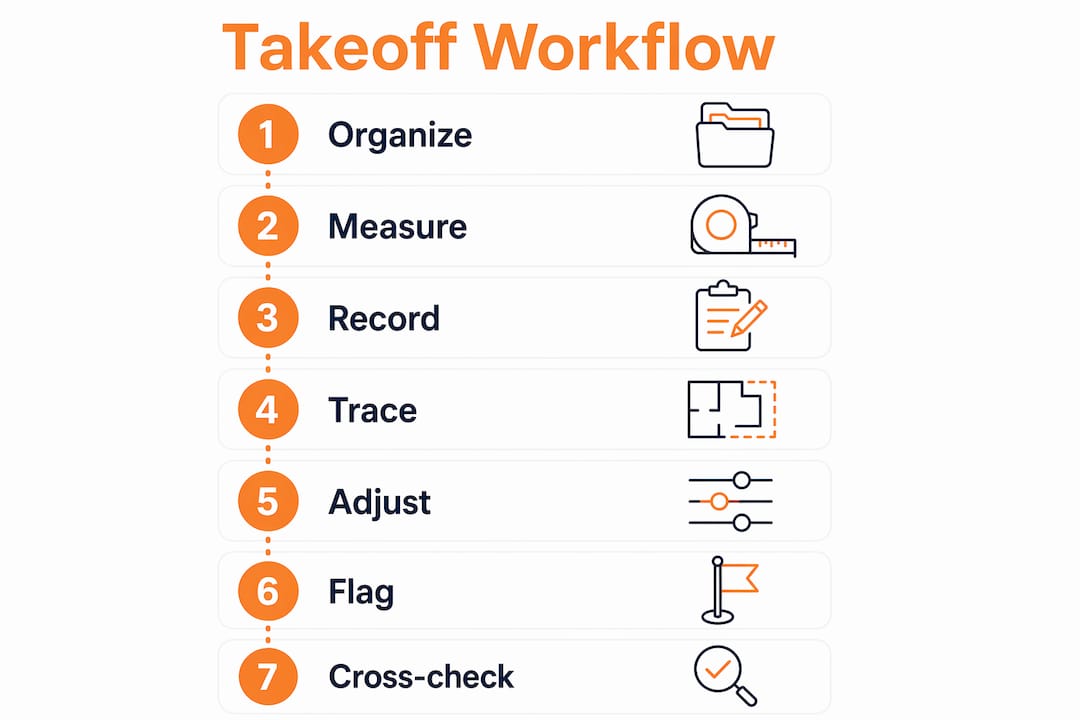
A systematic workflow is what separates a reliable takeoff from a rushed one. The goal is to measure every item once, record it clearly, and never leave a scope gap. Here is how to approach how to read takeoff drawings by trade or CSI division.
Step 1: Organize your plan set by trade. Sort sheets into groups before you start measuring. Concrete work pulls from structural and civil sheets. Framing pulls from architectural and structural. MEP trades each have their own sheet sets. Working one trade at a time prevents you from jumping between unrelated drawings and losing your place.
Step 2: Measure systematically, room by room or zone by zone. Pick a starting point on the plan and move in one consistent direction, typically left to right, top to bottom. Measuring systematically by trade or CSI division reduces the chance of double-counting or missing areas. Mark each area as you complete it using color-coded highlights in your digital tool or physical markup on printed sheets.
Step 3: Record quantities with sheet and detail references. Every quantity you record should include the sheet number and detail reference it came from. This creates an audit trail. If a number gets questioned during bid review or a change order dispute, you can trace it back to its source in seconds.
Step 4: Use digital takeoff software to trace and calculate. Digital takeoff software automates measurement calculations and manages quantities with built-in audit trails. Drawing on PDFs directly reduces manual math and human error. Won2build Takeoff, for example, lets you trace linear, area, and count measurements directly on uploaded plan files, then feeds those quantities into your bid estimate without re-entry.
Step 5: Apply waste and contingency factors. Raw measurements from the plan do not account for cuts, overlaps, or field conditions. Standard waste factors vary by material: drywall typically runs 10–15%, flooring runs 5–10%, and concrete adds 5–8% for form waste and over-pour. Apply these factors before finalizing quantities.
Step 6: Flag scope inclusions and exclusions explicitly. Document what your takeoff covers and what it does not. This protects you during bid leveling and prevents scope creep. A clear commercial bid scope statement tied to your takeoff quantities is your first line of defense against disputes.
Step 7: Cross-check for consistency across drawings. Cross-referencing architectural, structural, and MEP sheets early avoids discrepancies and costly mistakes. A wall shown on the architectural plan must match the structural plan in location and thickness. A ceiling height on an elevation must match the section cut. Inconsistencies found before bidding prevent change orders during construction.
What are the most common blueprint reading mistakes?
Even experienced estimators make repeatable errors when reading blueprints for estimates. Knowing where the traps are is the fastest way to avoid them.
- Using a ruler on a digital PDF instead of reading labeled dimensions. Scaled measurements on screen are only as accurate as your zoom level and calibration. Always read the printed dimension label first.
- Skipping scale verification on detail sheets. Detail views almost always use a larger scale than the floor plan. Measuring a detail at floor plan scale produces wildly inflated quantities.
- Ignoring revision clouds. Revision clouds mark areas that changed between drawing versions. Missing a revision cloud means you are pricing work that no longer exists or missing work that was added.
- Treating the blueprint as the only source of truth. The spec book controls material quality. Pricing materials from plans alone without specs risks using wrong grades or finishes, which changes your cost significantly.
- Failing to issue RFIs on unclear details. If a detail is ambiguous, do not guess. Issue a Request for Information before the bid deadline. Guessing costs more than asking.
Pro Tip: Build a personal checklist of the mistakes you catch most often on your own takeoffs. Review it before submitting every bid. Patterns in your errors are the fastest path to improving your estimating accuracy.
Key takeaways
Accurate takeoffs depend on reading blueprints correctly from the first document review through the final cross-check, with no step skipped and every measurement traced back to its source.
| Point | Details |
|---|---|
| Start with cover sheet and legend | Decode symbols and verify revision dates before measuring anything. |
| Verify scale on every view | Multiple scales appear per sheet; calibrate digitally using a known dimension. |
| Read labeled dimensions first | Never scale a drawing manually when a printed dimension is available. |
| Cross-reference all disciplines | Match architectural, structural, and MEP drawings to catch conflicts before bidding. |
| Record quantities with source references | Link every number to its sheet and detail to support bid defense and change order tracking. |
Blueprint reading is a skill you build, not a shortcut you find
I have reviewed takeoffs from estimators at every experience level, and the ones that hold up under scrutiny share one trait: the estimator clearly read the drawings before they started measuring. That sounds obvious, but most errors I see come from people who opened the software and started clicking before they understood what they were looking at.
The biggest shift I made in my own practice was treating the cover sheet review as a non-negotiable 20-minute investment on every new project. That time pays back tenfold when you catch a scale discrepancy or a missing revision before you have traced 40 sheets worth of quantities.
Digital tools have genuinely changed what is possible in terms of speed and accuracy. But I have seen estimators use PlanSwift or STACK and still produce bad takeoffs because they did not understand the drawings underneath the software. The tool amplifies your blueprint reading skill. It does not replace it.
My advice to subcontractors building this skill: study one complete drawing set per week, even on projects you are not bidding. Read the legend, trace the cross-references, and find the inconsistencies. Drawing standards evolve, and the estimators who stay current are the ones who treat blueprint reading as a craft, not a chore. The construction measurement tools available today make accuracy more achievable than ever, but only if you bring the foundational reading skills to the table.
— Jen Reese
Take your takeoffs further with Won2build
Accurate blueprint reading is the foundation. Won2build Takeoff is the tool that turns that foundation into fast, defensible estimates.

Won2build Takeoff lets you upload digital plan files, calibrate scales in seconds, and trace linear, area, and count measurements directly on your drawings. Quantities feed automatically into your bid estimates through Won2build’s single sign-on suite, eliminating re-entry and the errors that come with it. The built-in audit trail links every quantity back to its source sheet, so you can defend your numbers at bid leveling or during a change order review. If you want to protect your margins and submit bids with confidence, explore Won2build’s takeoff software and see how it fits your estimating workflow.
FAQ
What does “read blueprints for takeoffs” mean?
Reading blueprints for takeoffs means interpreting construction drawings to measure and quantify materials, labor, and scope items needed to build a project. The output is a list of quantities used to build a cost estimate or bid.
How do you verify the correct scale on a blueprint?
Locate the scale notation in the drawing’s title block or below the view label, then confirm it using the graphical scale bar or a labeled dimension. In digital takeoff software, calibrate the scale using a known dimension before tracing any measurements.
What is the difference between a blueprint and a specification book?
A blueprint shows where materials go and how much is needed. A specification book defines the quality, grade, and performance requirements for those materials. Both documents are required for an accurate takeoff and bid.
Why should you cross-reference architectural and structural drawings?
Cross-referencing architectural and structural sheets catches conflicts in wall locations, ceiling heights, and structural member sizes before bidding. Conflicts found after contract award become change orders that cost time and money.
What is an RFI and when should you use it during a takeoff?
An RFI, or Request for Information, is a formal question submitted to the design team when a drawing detail is unclear or contradictory. Submit RFIs before the bid deadline so you can price the correct scope rather than guessing.
Recommended
One login for estimating, bid tracking, change orders, and labor.
The Hub is free. Pay only for the apps you turn on.
Create your free Hub account- The Role of Electronic Time Tracking for Construction ProjectsDiscover the role of electronic time tracking in construction projects. Improve accuracy, compliance, and efficiency while saving time and money.
- How to Set Up Project Budget Tracking for ContractorsLearn how to set up project budget tracking effectively. Avoid costly surprises and ensure project profitability with our comprehensive guide.
- Why Commercial Bids Require Detailed TakeoffsLearn why commercial bids require detailed takeoffs for accurate estimates. Master the process and boost your project's profitability today!